All posts by bill

cgminer2

Bitcoin Mining Client cgminer as a systemd Service

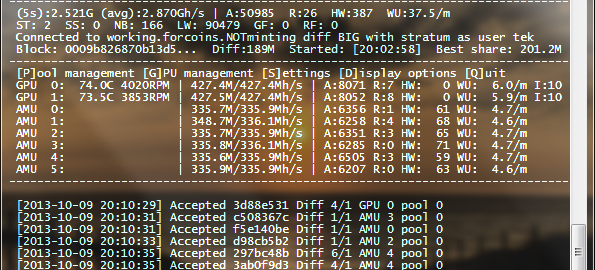
Here’s a short and simple way to configure the popular Bitcoin mining client cgminer as a systemd service.  It’s convenient to run cgminer in a screen window so that I can attach to it remotely to see, tweak, etc.  Running the combination as a systemd service lets me start it automatically, connect to it in progress as needed, even issue a systemd reload command to cause cgminer to restart and re-read it’s configuration file after changes are made.

The good news is that systemd is easy and works well!

Requirements

You should already have a functioning Linux distribution utilizing systemd, the Screen application, and a working implementation of cgminer.  I set this up using a Fedora environment so there may be differences for your distribution.

Create Launch Script

Create a short script with any needed environment variables to launch cgminer and make it executable (chmod +x start-miner).  I used ‘start-miner’ in my miner user’s home directory:

#!/bin/sh
# Simple script to start cgminer
cd /home/miner/bitcoin/cgminer-3.4.3/
DISPLAY=:0 ./cgminer --config miner.conf

Create the Service

I’m using a ‘simple’ type service in systemd, but you can also set it up as a ‘forking’ type service by configuring screen to fork in the background (see comments below).  Setup the cgminer service by creating this file:

/lib/systemd/system/cgminer.service

with the following lines (the lines beginning with ‘#’ are comments for alternatives and are not needed):

[Unit]
Description=cgminer
After=network.target
After=graphical.target

[Service]
#Type=forking
Type=simple
User=miner

#Start:
# screen -dm creates detached session that forks.
#  use this with Type=forking
#ExecStart=/usr/bin/screen -LdmS cgminer /home/miner/start-miner
#
# screen -Dm creates detached session that doesn't fork.
#  use this with Type=simple
ExecStart=/usr/bin/screen -LDmS cgminer /home/miner/start-miner

#Stop:
# tell cgminer to quit (not screen), and screen will exit
ExecStop=/usr/bin/screen -S cgminer -X stuff 'q'

# or tell screen to quit and clobber cgminer - not best choice
#ExecStop=/usr/bin/screen -S cgminer -X quit
#Probably need a kill definition in case the miner is hung

#Reload:
# sending the string 'scy' (settings, restart, yes) to cgminer will 
#  cause a restart which will re-read config file if using one
ExecReload=/usr/bin/screen -S cgminer -X stuff 'scy'

[Install]
WantedBy=multi-user.target

Reload the systemd configuration

Any time you change the service definition, you should issue the following command to reload systemd:

# systemctl daemon-reload

Enable the service

When you enable the service, you should see systemd respond by creating the appropriate symbolic link like below:

# systemctl enable cgminer.service
 ln -s '/lib/systemd/system/cgminer.service' '/etc/systemd/system/multi-user.target.wants/cgminer.service'

Starting/Stopping the service

You can start or stop the service normally:

# systemctl start cgminer.service
# systemctl stop cgminer.service

Reload the service

If you use a config file like in my example above in the start_miner script, then you can make changes to it and tell systemd to reload the service.  This will send cgminer the key sequence telling it to restart which will re-read the config file.  If you are attached to the screen window, you can see the restart happen.

# systemctl reload cgminer.service

Status Command

# systemctl status cgminer.service
cgminer.service - cgminer
          Loaded: loaded (/lib/systemd/system/cgminer.service)
          Active: active (running) since Wed, 09 Oct 2013 17:17:53 -0400; 13min ago
        Main PID: 10101 (screen)
          CGroup: name=systemd:/system/cgminer.service
                   10101 /usr/bin/SCREEN -LDmS cgminer /home/miner/start-miner
                   10103 /bin/sh /home/miner/start-miner
                   10104 ./cgminer --config miner.conf

That’s it!  There’s probably much that could be done to make this better, but it is working for me.  Comments or suggestions are always welcome.
Preserve Linux Bash Shell History from Multiple Sessions

Save command history from multiple terminal sessions, and control the size of the history buffer in memory and the history file on disk.

The Linux Bash shell history size & settings are not necessarily configured optimally by default, but there are environment variables and options that are easy to change and can help significantly.  The History command is a powerful tool and a great makeshift knowledge base for lazy admins.  Unfortunately many Linux distributions default to a very limited command recall environment that not only retains a tiny list of commands, but is also overwritten each time a terminal session exits.  The default behavior is great if you only use one session at the time (although it may still be too small).  When you launch the session, it reads the saved history into your buffer, and then new commands are appended as you use it.  Then when you exit, the complete history from your buffer (old + new) is saved back to the history file.  But if you tend to have more than one terminal session open at the same time, then you have probably experienced the frustration of having the command history in the last closed session overwrite all the important history that was in another active shell session and closed first.  Luckily, there is a more rational configuration.

Save History from Multiple Concurrent Sessions

The histappend shell option tells bash to append new lines of history to the file instead of overwriting it with your current copy of old + new.  There is a subtle difference, but there is a difference, and this is the key to saving all the history from multiple concurrent terminal sessions instead of just the last one closed.  You can enable this behavior using the shell option command shopt from the command line, and you can add it to your .bashrc file so that it is enabled by default.

$ shopt -s histappend

Customizing Command History (Recall) Size

You can also modify the HISTSIZE and HISTFILESIZE environment variables to retain more history (or less if that’s what you want 😉 ).

There are many permutations about how this can be done, and there are many, many more opinions about how it should be done.

The HISTSIZE environment variable controls the number of commands to remember in memory, and it defaults to 500.  Distributions often set it to 1000, but even that is too small.  Per the bash manpage, if HISTSIZE is unset, then no history is saved.  So it needs a value unless you are hiding your tracks.  I prefer it to be large enough to store everything I do in a session.

The HISTFILESIZE environment variable controls the number of lines saved in the history file itself.  Per the bash manpage, it too defaults to 500, but if it is unset, then the file will not be truncated, and that’s exactly what I want: no limit.

There are others you might want to be familiar with like HISTCONTROL which can alter the behavior to ignore duplicates lines or lines that start with spaces, etc., and HISTIGNORE which can contain patterns that shouldn’t be saved at all.  See the bash man page for more information.

The following will set the number of lines to remember (in memory) to 1048576, it will “unset” the file size so that there is not a limit to the history saved on disk, and it will configure the shell option to append.  There are potential ramifications to having an unlimited history size, and you have to choose the options that are right for you, but this retains everything for all sessions which is exactly the behavior I want.  You can add this to your .bashrc or .bash_profile as appropriate.

HISTSIZE=1048576
unset HISTFILESIZE
export HISTSIZE HISTFILESIZE
shopt -s histappend